You’ve started customising your Showit website template, and while adding your own content was a breeze (or maybe not), it’s time to update the template to match your brand colours!
Showit was built to make life easier for business owners, especially those who aren’t ready to outsource their website fully or who need to make minor changes (like updating their colours after a mini rebrand or new template purchase).
That’s exactly what we’re walking through today: how to update your brand colours in Showit and create a website you’ll feel excited about publishing.
How to Update Your Color Palette in Showit
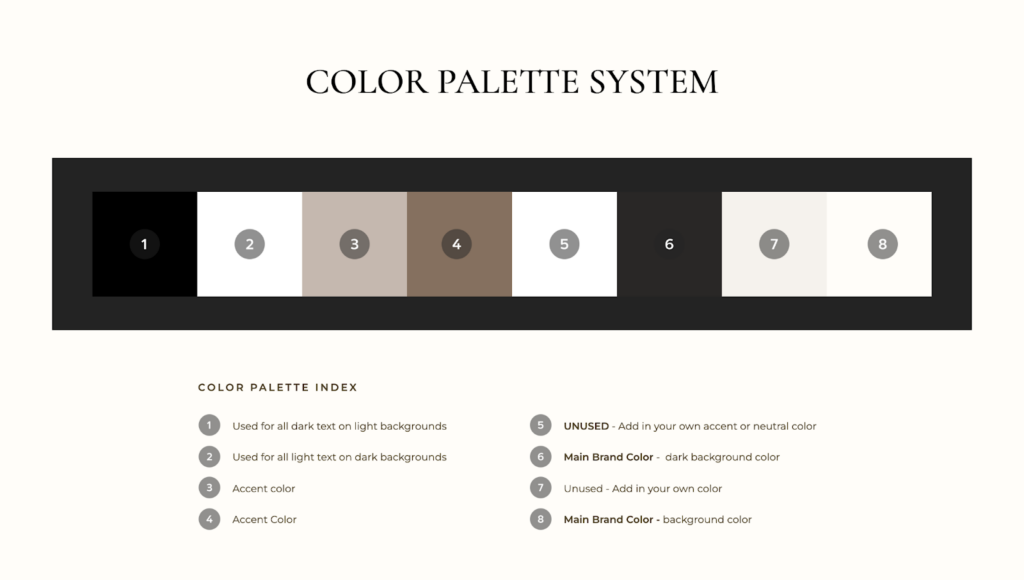
Your colour palette is where you add your brand colours in Showit to display across your website. The corresponding colour, labelled 1-8, will apply to the colour used throughout your website.
For example, if the designer created their template correctly, and the accent colour is green, and you update green to navy, it should update throughout your entire website.
Here’s how to add and update your brand colours in Showit:
Step #1: Prepare Your Branding
Before you start updating or editing your brand colours on your website, you’ll need to have them on hand. Write down your hex codes for each colour to reference in the final step.
Step #2: Head to Your Design Settings
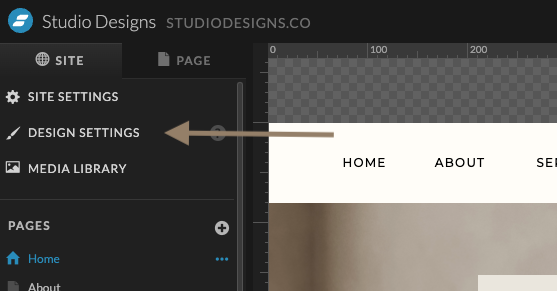
Log in to your Showit website and go to your Design Settings. They should be located in the top left corner of your dashboard under your site name and icon in the menu panel.
This is also where you can add and update your font styles and sizes!
Step #3: Update Your Colour Palette
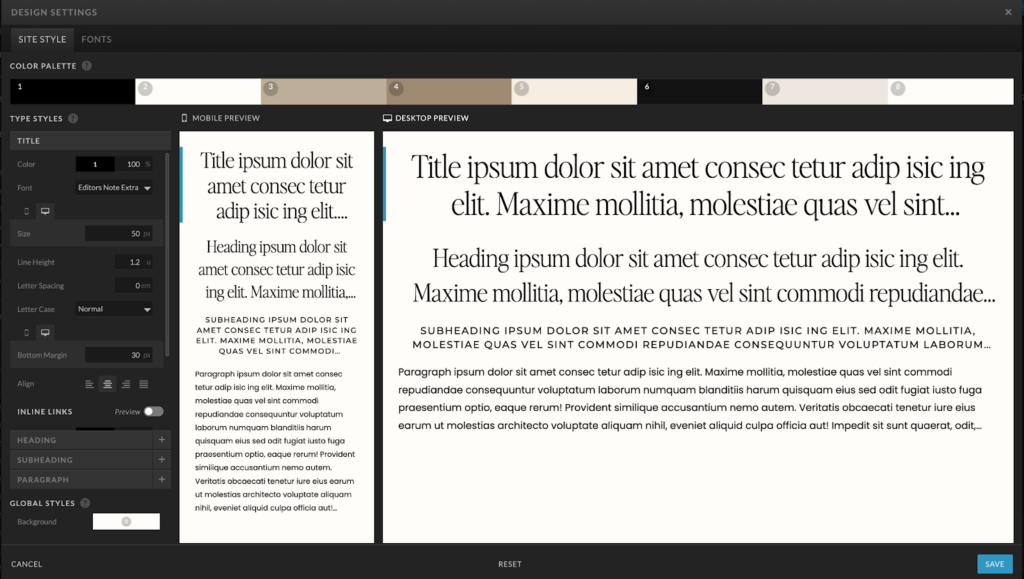
A screen should pop up showing your fonts and current colour palette. If you don’t see your palette, look in the top left corner of your Design Settings and click on Site Style. This should bring you to the correct settings.
To update your colour palette to match your brand colours, click on the colour you want to update in the top row and enter the hex code of the colour you want to change it to.

A good rule of thumb is to update to colours of a similar shade wherever possible. For example, if the template is using a darker colour, replace it with a darker brand colour. If it uses a light colour, use a light brand colour.
For our templates, we provide a colour palette guideline to make the switch seamless:
Repeat until you’ve replaced all existing colours in the palette with your brand colours, and don’t forget to hit save in the bottom right corner when you’re done!
Step #4: Check Your Website and Adjust Colours
Comb through each page of your website to confirm that all colours are updated and that there are no hard-to-read contrasting colours. Manually update each element or canvas to the correct or better-matched colour of your palette.
Take your time on this step. It might feel time-consuming, but it will save you time and a potential headache later.
Matching Your New Template to Your Brand
One of the perks of working with a new template is bringing it to life with your branding — and luckily, it’s not as time-consuming or draining as building your website from scratch.
Updating your colour palette is just one step in customising your template. You still need to update your fonts, imagery (if you haven’t already done so), and logos.
If you really want to get the most out of your new website, you should dedicate some time after updating your visuals to start optimising your site for SEO by adding page titles, meta descriptions, and share images to every page.
Looking for a template to customise? Find your perfect match by taking the template quiz — Take the Quiz.